
Setup Instructions
Installation
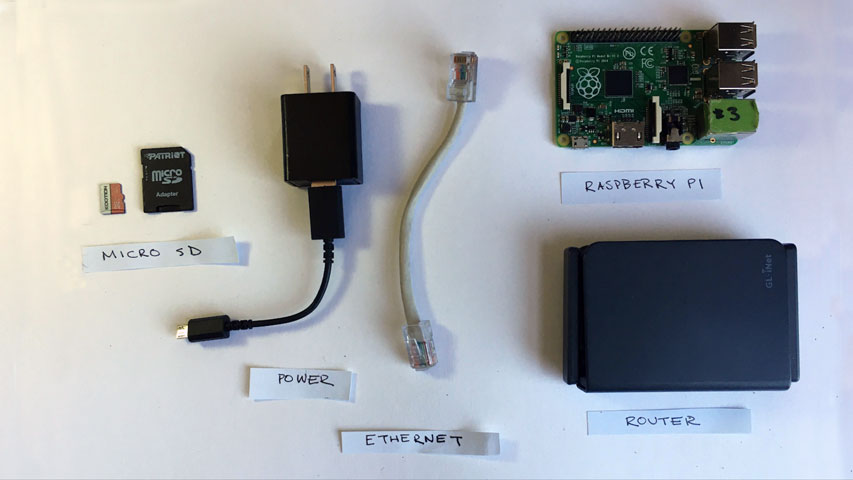
Bridge is distributed as a disk image for a Raspberry Pi, version 3B+/4B. Its software is provided as open-source with detailed installation instructions for Windows, Mac OS, and Linux build machines. It requires minimal hardware to operate, using the onboard wifi to create a wireless access point. To provide internet sharing, the network needs an ethernet cable and internet modem or router.
Build System
Material Requirements
You can use a wide range of materials, but to get you started here is my budget oriented list.
| Material | Order Link |
| Raspberry Pi 3B+/4B | Official Link |
| 8GB+ Micro SD card (C10) | Amazon |
| Micro SD Card Reader | Amazon |
| Bridge Image | Download |
| Balena Etcher | Balena Etcher |
| SSH Client | PuTTY |
| Internet Modem/ Router | Amazon |
Windows Build
- Download and install Balena Etcher
- Download Bridge image
- Insert Micro SD card into build machine
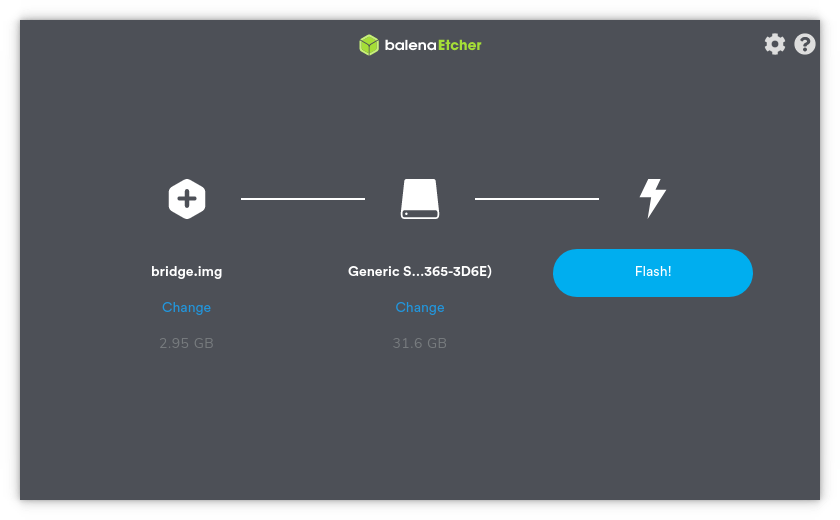
- Open Balena Etcher and select bridge.img.gz as your image and your SD card as target drive
- Confirm your target drive and Flash Screenshot of Balena Etcher
- When flash is complete eject SD card and insert into Raspberry Pi
- Connect Raspberry Pi to internet modem with Ethernet cable and power on the Raspberry Pi
- The first boot will take extra time to expand the SD card and initialize software, wait at least 10 minutes
- When it is completed a wireless network should be visible named Bridge WiFi (If it does not appear please power cycle the Raspberry Pi)
- Connect to Bridge WiFi with the password community
-
Use PuTTY to SSH into the Raspberry Pi
Host:oper@10.0.0.1
Port:22
Password:bridge -
Change WiFi SSID and Password by running
sudo bash configurewifi.shin the Raspberry Pi shell - You should now be broadcasting your own WiFi network with Pi Hole DNS sinkhole, Squid Cache, and Node Express Web Server
-
The local web server can be accessed in the browser at either
http://bridgeorhttp://10.0.0.1 -
The Pi-Hole Dashboard can be accessed in the browser at
ttp://pi.hole:8080/adminh - Follow post-installation instructions to configure your clients to make use of Squid HTTP proxy.
Mac OS
- Download and install Balena Etcher
- Download Bridge image
- Insert Micro SD card into build machine
- Open Balena Etcher and select bridge.img.gz as your image and your SD card as target drive
- Confirm your target drive and Flash Screenshot of Balena Etcher
- When flash is complete eject SD card and insert into Raspberry Pi
- Connect Raspberry Pi to internet modem with Ethernet cable and power on the Raspberry Pi
- The first boot will take extra time to expand the SD card and initialize software, wait at least 10 minutes
- When it is completed a wireless network should be visible named Bridge WiFi (If it does not appear please power cycle the Raspberry Pi)
- Connect to Bridge WiFi with the password community
-
Use your preferred SSH client to login the Raspberry Pi
Host:oper@10.0.0.1
Port:22
Password:bridge -
Change WiFi SSID and Password by running
sudo bash configurewifi.shin the Raspberry Pi shell - You should now be broadcasting your own WiFi network with Pi Hole DNS sinkhole, Squid Cache, and Node Express Web Server
-
The local web server can be accessed in the browser at either
http://bridgeorhttp://10.0.0.1 -
The Pi-Hole Dashboard can be accessed in the browser at
http://pi.hole:8080/admin -
Follow
post-installation instructionsto configure your clients to make use of Squid HTTP proxy.

Linux
- Download and install Balena Etcher
- Download Bridge image
- Insert Micro SD card into build machine
- Open Balena Etcher and select bridge.img.gz as your image and your SD card as target drive
- Confirm your target drive and Flash Screenshot of Balena Etcher
- When flash is complete eject SD card and insert into Raspberry Pi
- Connect Raspberry Pi to internet modem with Ethernet cable and power on the Raspberry Pi
- The first boot will take extra time to expand the SD card and initialize software, wait at least 10 minutes
- When it is completed a wireless network should be visible named Bridge WiFi (If it does not appear please power cycle the Raspberry Pi)
- Connect to Bridge WiFi with the password community
-
Use your preferred SSH client and login into the Raspberry Pi
Host:oper@10.0.0.1
Port:22
Password:bridge -
Change WiFi SSID and Password by running
sudo bash configurewifi.shin the Raspberry Pi shell - You should now be broadcasting your own WiFi network with Pi Hole DNS sinkhole, Squid Cache, and Node Express Web Server
-
The local web server can be accessed in the browser at either
http://bridgeorhttp://10.0.0.1 -
The Pi-Hole Dashboard can be accessed in the browser at
http://pi.hole:8080/admin - Follow post-installation instructions to configure your clients to make use of Squid HTTP proxy.
Post Installation
To make use of Squid HTTP Web Cache you must configure your client devices to use the router as the HTTP Proxy. This enables Squid Cache to act as a proxy server allowing all connected to use the network cache server which will allow faster web requests for connected clients. It is optimal to configure the proxy in your system settings so that all applications running your device. The specific instructions will vary between operating systems, but you can use Chrome Browser to navigate to your system proxy settings.
Computer/ Chrome Proxy Setup
- Open Chrome and open Preferences panel
- Navigate to Advanced > Systems page
- Manually configure proxy with the router IP address as your proxy server
- HTTP Proxy:
10.0.0.1 - Port:
3128 -
You can test the proxy configuration by running in a terminal window
curl -x 10.0.0.1:3128 example.comand if it returns the web page your proxy works! - You should be now be sending requests to the Squid Proxy Server! This will speed up your internet as devices on the network will cache http here.
Firefox Client
You can manually set the router as the proxy server on Firefox Browser. You will do this in the browser's preferences page.
- Open Firefox Browser and go to Preferences panel
- Navigate to Network Settings and select settings
- Select Manual Proxy Configuration and set:
- HTTP Proxy:
10.0.0.1 - Port:
3128 - You can test if it is operating properly by visiting a bogus URL (ldfkjalgkjalj.com). If you receive an error from Squid it means your device is sending requests through the proxy server. Alternatively you can run a packet capture to see HTTP requests are going through port 3128.
- You should be now be sending requests to the Squid Proxy Server! This will speed up your internet as devices on the network will cache http here.
Mobile Device
Iphone
- Navigate WiFi Settings
- WiFi Settings
- Select to Bridge WiFi options Bridge Wifi Options IOS
- Select Configure Proxy
- Enable Manual Proxy
- Server:
10.0.0.1 - Port:
3128 - You should be now be sending requests to the Squid Proxy Server! This will speed up your internet as devices on the network will cache http here.